Friday, October 30, 2009

End of the week - End of the turkey soup


I made a HUGE pot of turkey soup on Monday, had it for lunch on Tuesday, gave my son and daughter in law a HUGE container of soup Tuesday night. Had it for lunch Wednesday, Thursday and today, and oh my, I still have some and I really can't eat another bite or look at any more turkey soup. Enter my Seiko, our dog, he will eat it, he'll eat anything, and that's it, end of the soup and end of the week.


HAPPY HALLOWEEN EVERYONE


Thursday, October 29, 2009

Christmas is coming

Are you ready? Getting ready? Almost ready?


I love Christmas, I love midnight Mass, getting together with family and friends, I love making cookies and special meals, getting up early to get the turkey in the oven and I guess in some ways I love giving gifts. But I no longer want to spend hundreds of dollars buying and stressing about the gifts. This year, for the most part I'm making most of my gifts. Little things, nothing extravagant, but made with love. As I'm sewing a little of this and a little of that I'm thinking about the very important people in my life and it gives me great joy and happiness.


But today I'm sewing some tree ornaments that I'll be swapping with folks from around the world. And I'll be thinking about these fine people and hope that this Christmas will be as special to them as it is to me.

Wednesday, October 28, 2009

Ginger Beer


About three weeks ago I wrote about my attempt at making ginger beer. A non-alcoholic drink naturally carbonated by using yeast. For some time I thought it would fail, the fermentation was not really working. I was going to throw it out but low and behold when I opened the bottle it fizzed. It is delicious, fuzzy and very easy to make. I only wish I had made during summer rather than now when a cold drink is not really needed.


GINGER BEER PLANT
In a glass jar - I used a mason jar add:
2 teaspoons white sugar
2 teaspoons of dry ground ginger - you can use raw ginger if you have it
A small pinch of dry yeast - the yeast you use for your bread
2 cups of tap water that has stood for 24 hours
4 sultanas (golden raisins) - for the wild yeast on the skin (optional) I did not do this


Stir this together and cover it with a cloth. It needs air but you don't want dust or insects crawling in. Leave it to sit on the kitchen bench. After about 2 or 3 days, depending on the temperatures in your house, it will begin to bubble and ferment. That is good. Fermentation is a healthy process,
Every day for 7 days, feed the plant 1 teaspoon ginger and 1 teaspoon sugar, and stir.


TO MAKE THE GINGER BEER
After 7 days take a clean piece of loosely woven cotton cloth, or a clean cotton tea towel and place it over a bowl. Pour the ginger plant into the fabric and twist the top of the cloth to make it into a ball. Squeeze out as much of the liquid as you can in to the bowl.
Dissolve 3 cups of sugar in 20 cups of water. Add juice of 2 lemons and the ginger mix. Stir and bottle in plastic bottles. Place the caps on the bottles but don't screw them on. Leave the ginger beer on the kitchen bench for a couple of days to ferment a little more, then tighten the caps and place the bottles in the fridge. Placing it in the fridge will slow the fermentation process to almost zero.


Lessons learned:

I don't often drink juice or pop and this was too sweet for my taste but really delicious. Next time I will make it with half the sugar.

I will also use smaller bottles, going through a 2 litre bottle takes a bit too long even though the ginger beer stays fuzzy for many days.


Tuesday, October 27, 2009

Luffa

Like most gardeners, I started gardening many years ago with one container, then I added another and then another...at the time I was renting and all I could really do was container gardening. All flowers. I never seriously thought about vegetables until about 4 years ago. At the time I was living in Britannia Beach and had lots of flower gardens but was looking for new gardening challenges ... that's when vegetables came into my gardening life.
My first year was not very good. I could basically count the number of vegetables I harvested on one hand. But I persevered and with the help of some very good advice from some very good gardeners. I amended my soil with compost, top soil, peat moss etc..
The second year was better, but just slightly. Again I worked on improving my soil and then...we moved. I'm now on my second year in Powell River my garden skills are improving. And although I've been much more successful with my vegetables, I still have a lot to learn but again looking for something new.

Enter Durgan a fabulous gardener I met on the Canadian Gardening forum. His garden is beautiful, well organized and he grows amazing fruit, vegetables and flowers. His blog is full of helpful hints and pictures to help gardeners, check it out http://www.durgan.org/Blog/.

I remember reading his post about growing luffas..growing luffas? Are luffas not from the sea?

Well no, they are grown, and I want to grow some, which if successful, will be paired with my home made soap, which I have yet to make...sigh...

But back to Durgan. I emailed him and asked where he purchased his seeds but instead he offered to mail some to me and I just got them in today's mail.


I hope these precious seeds grow big and strong so that I to can harvest luffas and pass along the seeds.

Monday, October 26, 2009

Rest and Relaxation

This weekend Art and I headed up to our float cabin. Art goes up every now and then to make sure everything is ok especially now with the water level at the lake being very low. Over winter and into spring the water level will continue to rise but right now Art wants to make sure our cabin floats and does not end up resting on the lake shore.

But this weekend was all about rest and relaxation. Good food, good books, some knitting and lots of sleep.

Leaving the Shinglemill Marina.


Heading up Powell Lake

Here we are, our beautiful but very cold cabin.
Art gets the fire going and the cabin warms up nicely.
The stumps are submerged in the summer.

Friday, October 23, 2009

Home made lasagna - Part 4


All the components are done so it's time to put it all together.

Cook your pasta in a large pot of boiling well salted water, about 4 to 5 minutes. Fresh pasta cooks faster than dry and you want the pasta to be "al dente" because it will also bake. Drain the pasta but don't rinse it. Just place it in a large bowl and pour a little oil over it to keep it from sticking. Watch it..it's very hot.


Spoon sauce on the bottom of your lasagna pan.


Then layer your pasta over the sauce. Spoon sauce over the pasta, then the bachamel and then sprinkle with a generous amount of grated parmigiano. Keep layering pasta, sauce, bachamel and parmigiano.


Finish your lasagna with sauce, bachamel, and parmigiano. Now I told you that my mom never added any other type of cheese. And you don't have to, it will taste delicious without but...if you have some mozzarella cheese you can add it. There is no such thing as too much cheese. In my case I just happened to have some so I added as the final topping.
At this point you can bake it for about 45 minutes in a 350F oven. However you can also freeze it when it's completely cool. The left overs freeze very well to. Just cover or wrap the lasagna in tin foil and once defrosted bake it covered until hot and bubbly. Uncover for the last 10 to 15 minutes to brown the cheese.
Take it of the oven, cut the lasagna into squares and serve piping hot with a simple green salad and crusty bread.


Left over pasta?


Roll your cooked lasagna noodles and cut it in slices.

Hold back a little bit of the sauce, trust me, you won't miss it and toss in the cut up pasta.


And there you have it a nice lunch or snack.


Thursday, October 22, 2009

Home made lasagna - part 3

Today's is all about home made pasta. I made pasta for the first time about 6 months ago. For many years I didn't even try because I was missing, in my mind, a very important piece of equipment, the pasta machine. I have one now, and I do love it, but take it from me, if you don't have one, try making homemade pasta anyways. Just use a rolling pin. True you might not get it as thin as store bought or machine rolled pasta but...the only real difference is that you will have to cook it longer, big deal, the taste is the same as thin pasta, honest.

In a large bowl place 400g of flour, make a well and add 3 eggs and 1/4 cup of water and 1 teaspoon of olive oil in the well. I find this messy and that's why I don't do it on the counter but you can if you wish.

As I stir the eggs, I break them and pick up flour. But...if the side of the well breaks or this method just is not working for you, don't worry, all you are trying to do is mix the flour, eggs. oil and water into a dough. This will be very hard dough and if you find it too dry just wet your hands and mix.


Form the dough into a disc, cover with plastic wrap and let it rest for at least 1/2 hour. It can be placed in the fridge for quite some time. Not sure how long because I always make the dough and use it within a day. If you refrigerated your dough make sure you take it out about one hour before you plan to roll it.


Cut your dough into 6 or 7 equal parts. You will work with one piece of dough at a time so make sure the remaining dough stays covered in the plastic wrap.


Time to roll.


I was unable to take pictures of the rolling but this is what you do.


Take one of the pieces of dough and dust it with some flour, with your hands or a rolling pin flatten the dough to about 1/4 inch thickness. Roll the dough through your machine's widest setting. Fold the dough into itself. Left to to just over the middle and right to just over the middle. Fold and roll until the dough is nice and smooth. You fold the dough only on the the first setting. After that you just roll. If at any time the dough rips, just bunch it up int a ball, and repeat the folding and rolling. Keep reducing the setting and rolling until you reach the desired thickness. If your dough is a bit sticky, dust it with a little bit of flour.


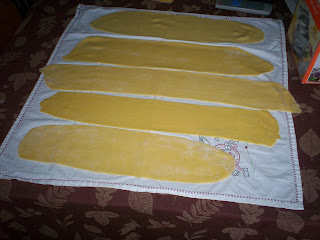
Place your rolled dough on a kitchen towel and leave it,uncovered, for at least one hour prior to boiling it. At this point you have a few choices if you don't want to use it right away. You can hang the dough to dry completely or you can lightly (very lightly) dust the dough with flour, fold it, and freeze it for future use. I've never dried my dough but I have frozen it. I took it out of the freezer and right into a boiling pot of water, it worked fine for a small amount of pasta (two people). If you need to cook more it's best to defrost it first.


Tomorrow we put it all together.